Tutorial
WooCommerce Attributes: How to Create, Manage and Display Them
If you run a WooCommerce store that stocks a large number of products, you might need help keeping all of them organized. Fortunately, WooCommerce already offers several different taxonomies by default, the most important of them being product attributes.
You can use product attributes to group items on your WooCommerce store and add any information you consider important for your customers to find exactly what they are looking for. Attributes are also crucial in setting up product variations within your eCommerce store, such as different sizes, colors, patterns, materials, and more. This is why understanding how product attributes work is essential for making the user experience on your WooCommerce store as good as possible.
In this article, we will cover in detail what product attributes are, their different types, how you can use them, and the best ways to display them on your WooCommerce store. Let’s get started!
What Are WooCommerce Product Attributes?
Attributes are one of the key types of taxonomies that WooCommerce uses to group products. One of their main uses is to provide additional product data that can be picked up when searching for and filtering products.
In straightforward terms, attributes are the different features you can apply to your WooCommerce products, such as color, size, materials, or brand.
There are two different types of attributes built into default WooCommerce. These are:
- Global Attributes: Global attributes can be applied to any product on your WooCommerce store. For example, packaged product dimensions can be a global attribute because all items need to be shipped.
- Custom Attributes: Custom attributes are specific to a particular product in your store. These can be useful for creating unique variations for some items. For example, specifications that only apply to one specific product, such as a particular pattern of shirt.
Understanding how to use your attributes effectively is vital for creating a good customer experience on your WooCommerce store, primarily because many customers will search or filter through your items using these properties. Suppose, for example, that a person comes to your eCommerce store looking for a shirt and also happens to really like blue apparel. If you have color attributes set up for your products, they can just filter by that specific swatch and find all the items that match their criteria!
Before we move on to the best ways to manage these properties, there is one more thing to keep in mind when it comes to grouping your products by taxonomy: the distinction between product attributes and product variations.
When you set up product variations, what you’re doing is basically enabling customers to buy different versions of the same product, differentiated by specific attributes, directly from the product page. In this way, attributes are essential for creating product variations, but they are not one and the same.
A good way to remember the distinction is to keep in mind that attributes are the characteristics you use to search for a particular version of a product, while variations are the products that you find at the end of that search. For example, if you are looking for a red T-shirt, you can filter by the “red” attribute. This search would bring up the “red” variation of the T-shirt product.
How Do You Create, Manage, and Display Attributes in WooCommerce?
Let’s see how you can create, manage, and display attributes for your products within WooCommerce.
Creating and Managing Attributes
Creating attributes in WooCommerce is very straightforward, although the process differs slightly depending on whether you are creating a global or a custom attribute. Don’t worry; we’ll cover both.
Creating and Managing Global Attributes
To create a global attribute, you need to do the following:
- From your WooCommerce dashboard, navigate to Products > Attributes.
- Add a name for your attribute. As an optional step, you can also choose a slug for it so you can have a URL-friendly version of the name.
- Choose whether or not to enable archives for the attribute. If you do enable this, the system will automatically create an archive page on your store where you can see all products that have this attribute.
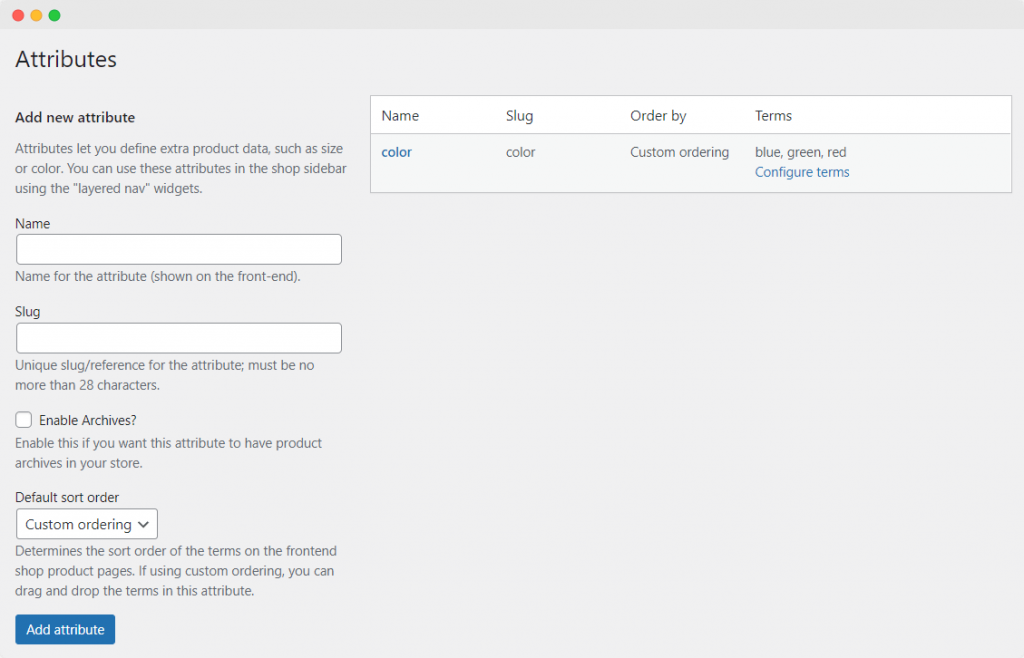
- Select a default sort order from the dropdown menu. This is important because it will determine the arrangement for these attributes as they appear on your product pages on the front end.
- Click on ‘Add attribute’. The attribute will be added to the list on the right-hand side of the page.
- We’re almost there! The next step is to add some terms for the attribute. For example, if your attribute is “color”, you can add specific colors like “red”, “blue”, “black”, etc., as terms. Click on ‘Configure terms’ and add as many terms as you need. Optionally, you can also choose a slug and a description for each term.
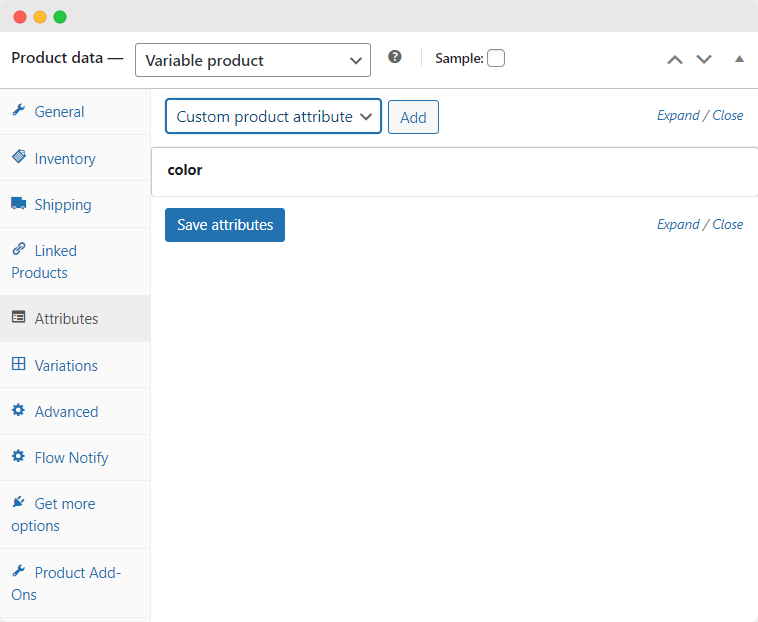
- It’s now time to apply these attributes to a product. To do this, go to Products > Add Product and select the ‘Attributes’ tab under product data. You can choose from any of the attributes you have created in the dropdown menu. Simply click on ‘Add’ to add them.
Creating and Managing Custom Attributes
The process is simpler for custom attributes. Just:
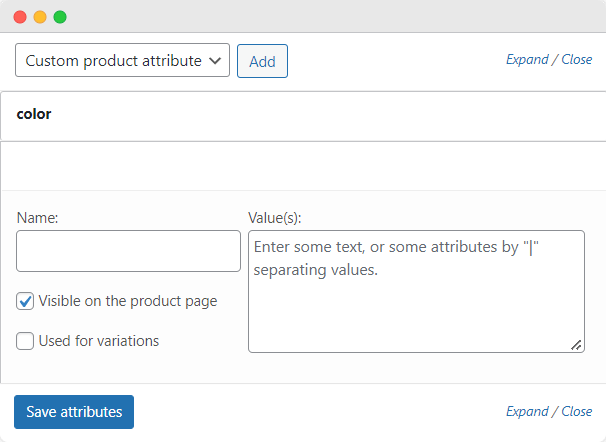
- Go to Products > Add Product, then select the ‘Attributes’ tab under product data.
- Select ‘Custom product attribute’ and click ‘Add’.
- Set a name for the attribute and add any terms you want to.
Displaying Attributes
There are two main ways to use attributes within default WooCommerce: You can filter by attribute or create product variations. Let’s take a look at each of these.
Filtering by Attribute
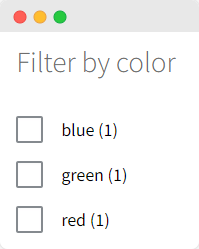
You might want to classify your entire product list using specific attributes you have created. This is essential if you have an extensive product catalog and want to make it easier for your customers to find exactly what they are looking for.
Filtering by attribute is very straightforward. Once you have set up your product attributes and applied them to your items, all you need to do is navigate to Appearance > Widgets, and add the ‘Filter by attribute’ widget to your sidebar. Then, choose which attributes you want customers to be able to filter by. That’s it! Your visitors will now be able to filter your product catalog using these attributes.
Creating Product Variations Using Product Attributes
As we mentioned, product variations are different versions of the same product that vary by just a specific attribute. So, for example, your store might stock red, blue, and green T-shirts, all of which are variants of your T-shirt product.
Adding product variations in WooCommerce is really simple, too.
- First, navigate to the product you want to add variations for and locate the dropdown under the ‘Product data’ section. Set the first dropdown (at the top of the box) to Variable Product.
- Go to the ‘Attributes’ tab. Here, you have a choice: You can add a custom product attribute or select one of your global attributes from the dropdown menu. Going back to our T-shirt example, you would select the ‘color’ attribute from the dropdown menu, then add the “red”, “green”, and “blue” values to it. Check the ‘Used for variations’ box once you’re done.
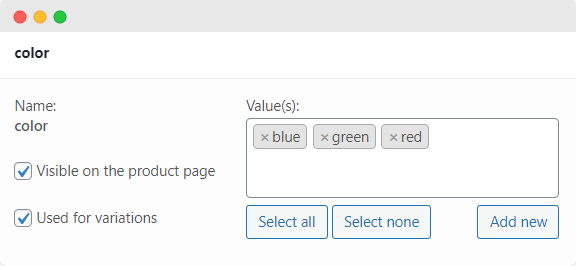
- Next, navigate to the ‘Variations’ tab, and from the dropdown menu select “Create variations from all attributes”. This will automatically generate new product variations based on all of the values you selected in the ‘Attributes’ tab.
- Now, it’s time to configure each product variation as you would a typical product. For example, you can add a product image, an SKU code, a price, a barcode, and more.
These product variations will now be live on the front end of your store! You can select them from the parent product page using the dropdown menu.
Displaying Product Variations Using Product Tables
Another way to make displaying your product variations more intuitive and attractive is by using a product table.
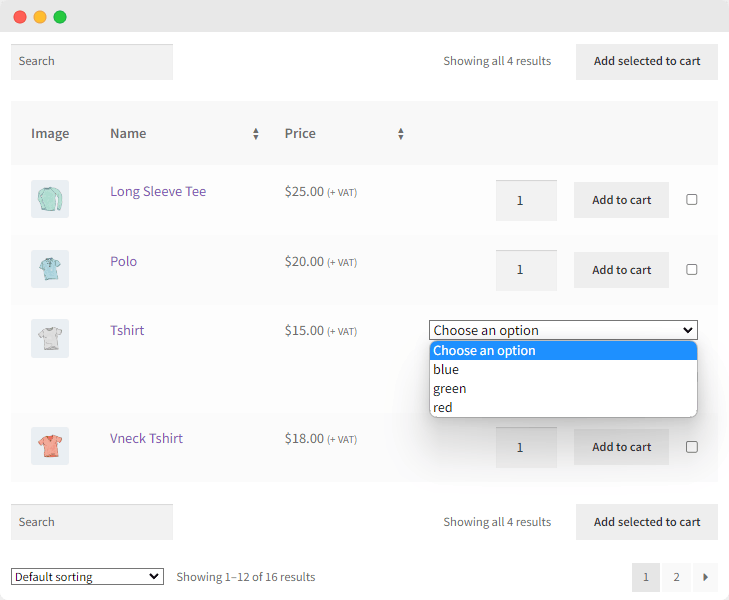
By default, your product variations will be displayed in a dropdown menu on the parent product page, something we’ve just covered above. This, however, isn’t the best format for product discoverability.
An alternative is to display them using a table. You can do this easily with the Product Tables for WooCommerce plugin from BizSwoop.
Showing all of your different product variations in an attractive visual display can help you streamline your customers’ shopping experience. One important advantage of this layout is that people can easily see and add products to their cart directly from the table without having to reload the page! You can also place this component anywhere on your site because the plugin generates a dedicated shortcode for every new table you create. If you want to learn more about how to set up a product table using Product Tables for WooCommerce, check out our dedicated guide.
Bonus Tip: How to Improve Your Store’s Customer Experience With Product Add-Ons
As we’ve covered, making use of WooCommerce attributes can help you improve the user search experience for your eCommerce store. This comes with various advantages: you can offer filtering options to make products easier to find or create different product variations – available directly from the parent product page – so customers don’t need to search through your entire product catalog to, for example, locate an item in a specific color.
However, if you really want to ensure visitors can find exactly what they need on your WooCommerce store, default product variations won’t cut it. Primarily because these variations are not customizable at all. If a customer doesn’t want one of your specific options, you could miss out on a sale. For example, if you sell pizzas and someone wants to add or remove certain toppings from theirs, you won’t be able to achieve this using WooCommerce’s default options alone.
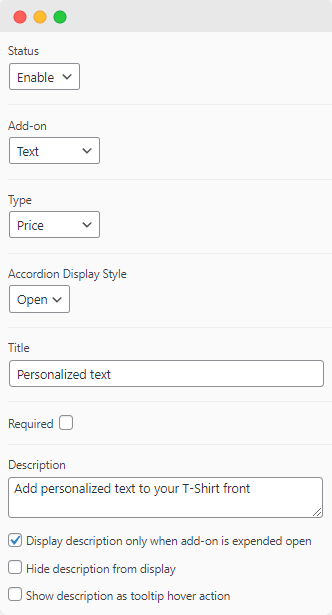
Luckily, there is an easy way to deal with this problem: You can use Product Manager Add-ons from BizSwoop to create customizable products for your WooCommerce store.
This plugin offers several advantages for store owners. For instance, you can use it to create customizable add-ons for all your WooCommerce products and give customers a chance to also come up with their own combinations! Plus, the tool comes with a host of other features to boost your store’s user experience:
- Intuitive Visual Add-on Display: The plugin allows you to choose from a variety of input options so you can create the most intuitive shopping experience for your customers. For example, you can use dropdown menus, radio buttons, checkboxes, text fields, and other input options to offer easy product customization. And you can even display your add-ons in an easy-to-understand visual format by adding thumbnail images and descriptions!
- Cart and Checkout Add-ons: Product Manager Add-ons enables you to offer your customers relevant add-on items right in the shopping cart or display them at the checkout. This can save them time and help you increase your bottom line with upsells and cross-sells.
- Offer Add-ons Both Online and In-Person: All add-on groups created using Product Manager Add-ons are designed to work with WooCommerce POS systems. If you’re looking for the best integration, you should look into BizSwoop’s own POS offering, Jovvie, which allows you to offer bespoke product customizations to your customers both online and in-store.
Let’s take a look at a practical example to see how the plugin can help you achieve what WooCommerce does not offer.
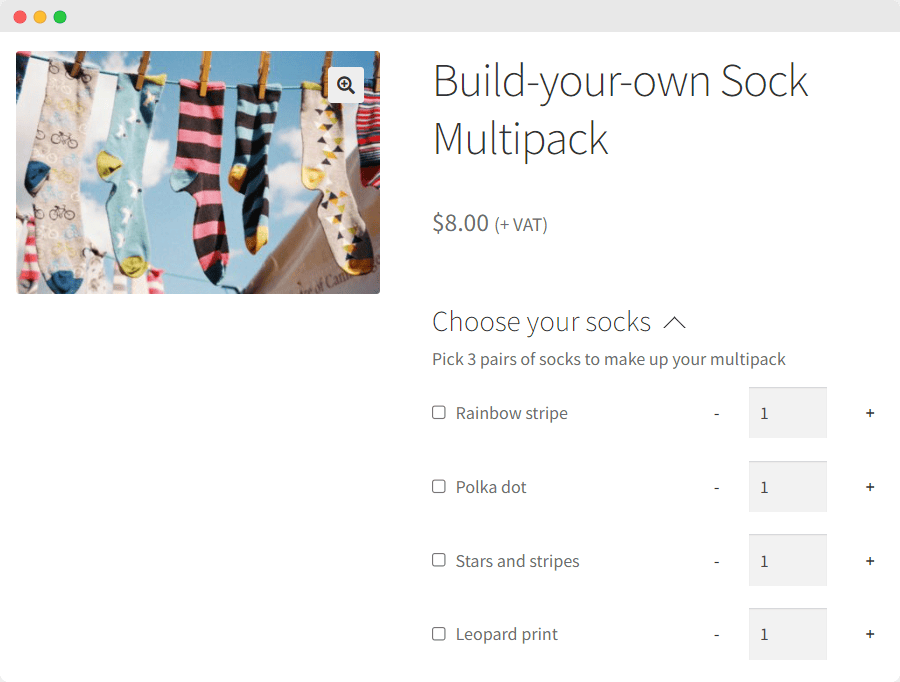
Imagine a customer who wants to buy a variety pack of three different pairs of socks from your clothing store. Your website offers multiple variants of the ‘Socks Multipack’ product, but none of them include the exact three pairs of socks the customer wants. So, what happens with a default WooCommerce installation? If your store uses only product variants, the customer will be tied to the multipacks on offer and end up with one pair of socks they don’t want (or, more likely, they won’t purchase the socks from your store at all!). You can avoid this problem by using an add-on group built with Product Manager Add-ons.
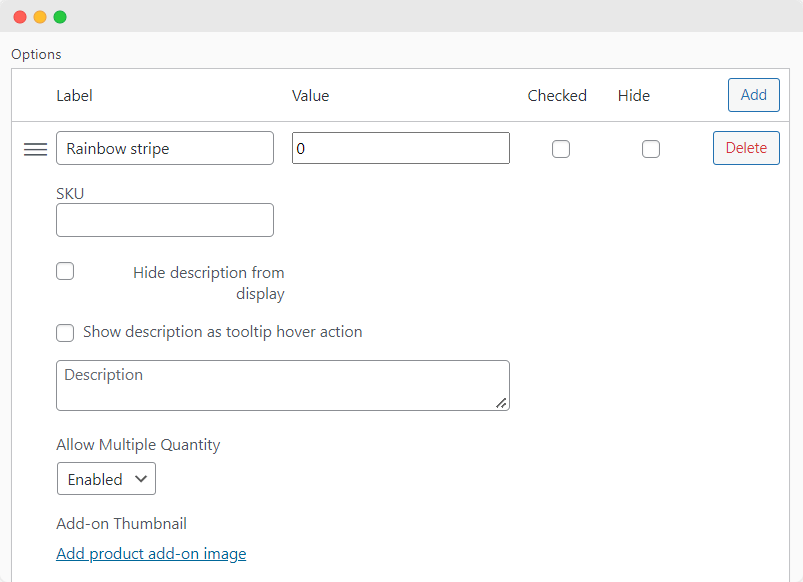
Customers could choose exactly which three pairs of socks they wanted and select their size all from the product page without the need for you to create endless product variations. This offers a better experience for your visitors by making it easier for them to find what they need. It also saves you time because you don’t need to produce endless variations of the same product while juggling multiple different attributes.
This only scratches the surface of what your WooCommerce store can achieve using Product Manager Add-ons. You can check out the full feature set on the BizSwoop site and even test the plugin out risk-free with a 14-day money-back guarantee.
Take Your Store’s User Experience to the Next Level
WooCommerce product attributes provide an excellent way to organize products on your online store. They can help your customers filter through your items with ease, which in turn helps to make your store more user-friendly. It can also support you in keeping track of all of your products if your store has an extensive product catalog.
However, while utilizing product attributes is a good start, you will need to utilize product add-ons to ensure your customers can find exactly what they are looking for when they come to your website. Product Manager Add-ons from BizSwoop is the best option to do so, as it allows you to add customizable product specifications to your WooCommerce store. Some of its main features include:
- A wide range of customization options so you can intuitively display your product add-ons.
- Display product add-ons on the product page, in the cart, and at the checkout.
- Offer add-on options both online and in-store thanks to strong POS integration.
Product Manager Add-ons is available from $49/year. You can test out the full feature set now with a 14-day money-back guarantee.


